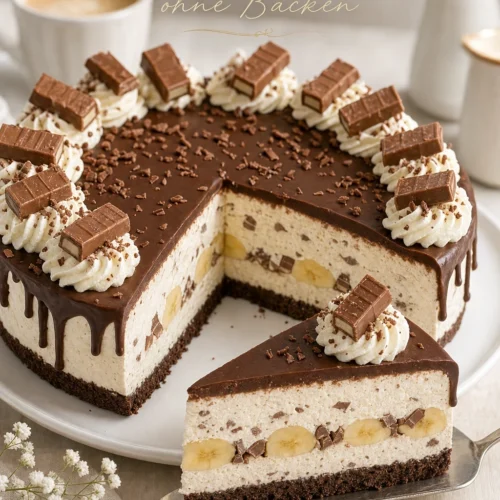
No-Bake Kinder Chocolate Bar Banana Cheesecake
In my small kitchen, things get a little cramped when I make this cake: chocolate, bananas, whipped cream rosettes and, of course, several Kinder chocolate bars are spread across the worktop, while I’m already making room for the cake in the fridge. This Kinder chocolate bar banana cheesecake is one of the recipes I especially like to make for friends, because it can easily be prepared the day before and looks really lovely when sliced. The base is chocolatey and crunchy, the filling is soft and vanilla-flavoured, with bananas and small pieces of chocolate in between. There’s no baking involved. The cake does need a little time in the fridge, though.
Equipment
- 26 cm springform pan
- Baking paper
- Mixer or food processor
- Hand mixer
- Mixing bowls
- Sieve or fine food processor for the cookies
- Saucepan
- Piping bag with a star nozzle
- Cake spatula or large spoon
Ingredients
Chocolate cookie base
- 250 g Chocolate cookies
- 100 g Butter, melted
- 1 tbsp Cocoa powder
Banana cream
- 500 g Mascarpone
- 400 ml Cold whipping cream
- 250 g Full-fat cream cheese
- 100 g Icing sugar
- 2 sachets Vanilla sugar
- 2 sachets Whipping cream stabiliser
- 5 Small Kinder chocolate bars, chopped
- 3–4 ripe but firm bananas
- 1 tbsp Lemon juice
Chocolate glaze
- 150 g Dark chocolate
- 100 ml Whipping cream
- 15 g Butter
Decoration
- 200 ml Whipping cream
- 1 sachets Whipping cream stabiliser
- 1 tbsp Icing sugar
- 5–6 Kinder chocolate bars
- 30 g Chocolate shavings
Instructions
Prepare the chocolate biscuit base
- Line the base of a 26 cm springform pan with baking paper. Put the chocolate biscuits in a food processor and grind them finely. If you don't have a food processor, put the biscuits in a sturdy freezer bag and roll over them with a rolling pin. There should be as few large pieces left as possible.
- Mix the biscuit crumbs with the baking cocoa. Add the melted butter and mix everything thoroughly. The mixture may seem a little dry at first, but you should be able to press it together. The consistency is right when no loose crumbs fall away as you press it together.
- Put the mixture in the pan and spread it out evenly. Press it down firmly with the base of a glass or a straight-sided measuring cup. It is worth checking the edge briefly to make sure the base is roughly the same thickness all the way around. Then put the pan in the refrigerator for about 30 minutes.
Prepare the bananas
- Peel the bananas and cut them in half lengthwise or into thick slices. Which shape works better depends somewhat on the size of the bananas. The pieces should not be too thin, or they will disappear completely into the cream later.
- Drizzle the lemon juice over the bananas. A thin coating is enough. The lemon juice slows oxidation and keeps the cut surfaces light in colour for longer. Set the prepared bananas aside until you assemble the cake, preferably not right next to a hot stovetop.
Mix the cream
- Put the mascarpone, cream cheese, powdered sugar and vanilla sugar in a large bowl. Briefly beat with a hand mixer until smooth. The mixture should become creamy, but does not need to be beaten for long. Overmixing can make the cream unnecessarily soft.
- In a second bowl, whip the cold whipping cream with the whipping cream stabilizer until stiff. It should hold its shape but not look grainy. Then fold the cream into the mascarpone and cream cheese mixture in two or three batches. A spatula works better than a mixer for this.
Fold in the Kinder chocolate bars
- Chop the small Kinder chocolate bars for the cream with a sharp knife. Very fine crumbs almost completely dissolve, while larger pieces give a pleasant chocolate bite when eating. Fold about two-thirds of the chopped pieces into the cream.
- Set aside the remaining pieces. They will go between the bananas and the second layer of cream later. This way, the Kinder chocolate pieces are visible not only in the cream, but also make a small chocolate layer when the cake is sliced.
Assemble the cake
- Take the chilled biscuit base out of the refrigerator. Spoon about one-third of the cream onto it and spread it with a palette knife or the back of a spoon. The surface does not need to be completely smooth; it just needs to form an even base for the bananas.
- Arrange the banana pieces close together on the cream. Leaving a small gap from the edge of the pan helps prevent the filling from being squeezed out later. Sprinkle the remaining chopped Kinder chocolate bars over the top.
- Now spread the remaining cream over the bananas. First place small portions on top, then smooth them out carefully. This prevents the bananas from being moved around unnecessarily. Make the surface as level as possible, since the glaze will be spread over it later.
Chill and let set
- Refrigerate the cake for at least 5 to 6 hours. Chilling it overnight is even better. This makes the cream firmer and allows the bananas to release their flavour into the filling.
- Keep the springform pan as level as possible while the cake chills. I cover the cake loosely with a cake cover or cling film, without letting the film touch the surface. This keeps the cream from absorbing refrigerator odours and prevents damage to the surface.
Prepare the chocolate glaze
- For the glaze, chop the dark chocolate and put it in a bowl with the butter. Heat the whipping cream in a small saucepan. It should be hot but not bubbling.
- Pour the hot cream over the chocolate and butter and leave it to stand briefly. Then stir slowly until the glaze is smooth and glossy. If any pieces of chocolate have not melted, you can briefly place the bowl over a warm water bath. Then leave the glaze to cool for a few minutes.
Glaze the cake
- Carefully release the well-chilled cake from the springform pan. If the edge does not release easily, run a thin, slightly warmed knife between the pan and the cake. Do not cut too deeply, or the edge will be damaged.
- First let the lukewarm glaze run down the edge in a few places. You can use a small spoon to place the drips where you want them. If the glaze is not running down too quickly, cover the rest of the edge and then spread some chocolate over the surface. You do not need to spread it all the way to the edge if you want the drips to remain visible.
Prepare the whipped cream decoration
- Whip the remaining whipping cream with the whipped cream stabilizer and icing sugar until stiff. Transfer the cream to a piping bag fitted with a star nozzle. Before piping, let the glaze set slightly so the cream rosettes do not slide into the chocolate.
- Pipe cream rosettes around the edge or at small intervals over the surface. Cut the Kinder chocolate bars into suitable pieces and place them between the rosettes. Finally, sprinkle the chocolate shavings over the top. The decoration does not have to look the same in every area. A slightly irregular edge often looks nicer than a perfectly symmetrical arrangement.
Chill once more and serve
- Chill the finished cake for approximately 30 minutes more. This will help the glaze set and keep the decorations in place. Use a sharp knife to cut the cake, briefly wiping the blade after each cut. This will help keep the slices neat.
- Serve the Kinder chocolate bar and banana cheesecake well chilled. If left at room temperature for a few minutes, the cream will soften slightly and taste more aromatic. However, in very warm weather, do not leave the cake on the table for long.
Notes
- The cake can be prepared the day before. The long chilling time is especially worthwhile for this no-bake cheesecake, as it makes the cream considerably more stable.
- The Kinder bar and banana cheesecake will keep, well covered, in the refrigerator for about two days. Because it contains fresh bananas, it shouldn’t be stored for much longer.
- The bananas should be ripe but still firm. Very soft bananas are difficult to layer and can make the cream watery in that area.
- For an even more intense chocolate flavour, stir 50 g of melted milk chocolate into some of the cream. Let the chocolate cool first so it doesn’t make the whipped cream collapse.
- If you want to transport the cake in warm weather, you can also use gelatine or a vegetarian setting agent. The amount depends on the product, so follow the package instructions carefully.
- Instead of dark chocolate, you can also use a milder chocolate with about 50 to 55 percent cocoa. Very sweet milk chocolate will make the whole cake even sweeter.